Article by: Winston Fong
Article applies to: all e23 models.
The E23 repair books say that the condenser must come out from the front of the car by removing the front bumper.
I thought that was a lot of work and I didn’t find it necessary to remove the front bumper after looking at the size of the condenser to radiator opening.
Of course I’ll never know which is easier since I never took off the front bumper and other parts to remove it from the front end.
This started when I did a yearly inspection of my coolant and ac system before the summer comes.
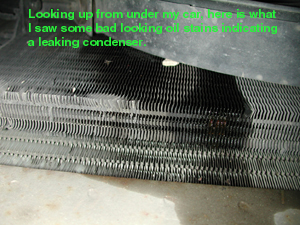
Being it’s a 17 year old car with 217,000 miles at this repair time (currently 241,000 miles) I crawled under the car where I found signs of oil leakage from the condenser.
Peering through the front grill I found more indications of pin hole leaks in my condenser by seeing the oil stains.
I then decided to change it before the heat of summer comes and I lose my freon or my compressor seizes due to loss of oil.

First I took my car to the local radiator shop and had them remove the r12 in the system.
If you live in Fremont, CA Cat’s radiator is an excellent place to take your radiator.
All my radiators from him have held up as well as original radiators.
Unlike another radiator shop where 3 of their radiators barely lasted a year and they refused to repair them.
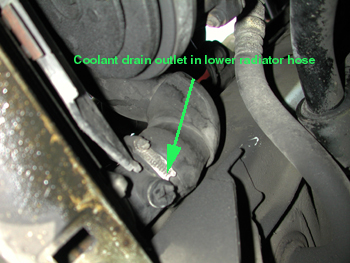
Start by draining the coolant from the drain plug located on the lower radiator hose.
After it drains out from the lower hose, drain the block also if your putting new coolant in.
The block drain plug is located below cylinder 6 on the right hand side, it’s a 19mm and hard to find for some.
Have a wide pan as it will splash everywhere.
If you’re having a bad day this should make things worse by drenching your face and half of your body in anti-freeze.
I don’t have a picture of the plug because the camera won’t fit for a good picture.
For bolt on cooling fan:
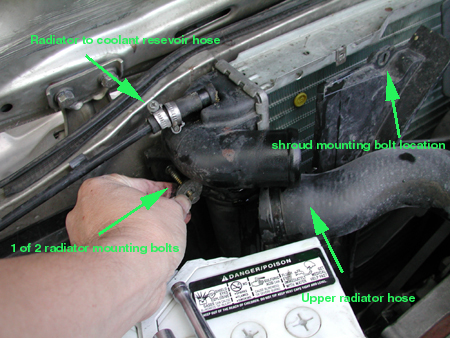
Next remove the upper and lower hoses from the radiator.
I suggest you remove the hoses by twisting and pushing the hoses toward the radiator to break them loose.
Once the hoses are loose you can carefully pull them off with less chance of damaging the outlets.
Don’t be rough on these plastic tank outlets they are known for breaking.
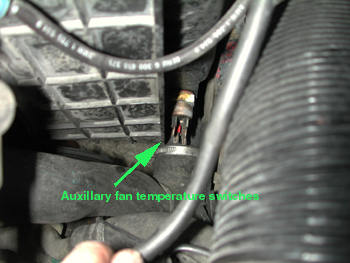
Next disconnect the auxiliary fan temperature switches on the right side of the radiator, hose from radiator to coolant tank on the left side.
Again be careful this one breaks even easier.
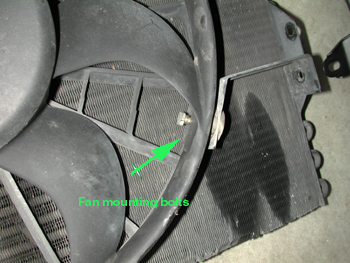
Remove the screws holding the fan shroud to the top of the radiator then lift up the shroud from the catches on the bottom and push it back and let it hang by the fan.
If you have an automatic disconnect the ATF coolant lines.
Then undo the 2 mounting bolts being careful to not drop and lose the spacers and washers.
Now lift the radiator straight up to remove it.
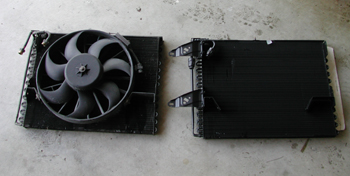
You can now remove the shroud and fan clutch by unbolting the center bolt and pulling fan and clutch forward.
If you have a screw on clutch you will need a 32 mm thin wrench to unscrew clutch which is a reverse thread you may even be able to remove it before taking the radiator out if there is room.
Condenser removal:
After radiator removal you’ll be able to reach in and remove the top mounting bolt for the condenser.
Go to the front of the car and remove the front grills both left , right and kidney grill held in by 4-6 screws.
You’ll need to remove the turn signals to remove them.
Unbolt the condenser from the condenser mounting brackets (I found a lot of the mounting bracket bolts loose or missing from all the year of usage).
Disconnect the auxiliary fan electrical connection, and when your ready to remove the condenser disconnect the hoses from the condenser.
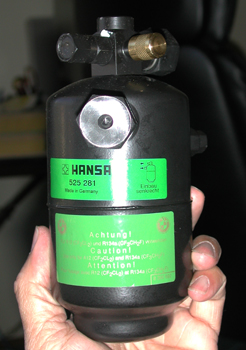
Remove condenser then remove fan from assembly. If you’re using the old filter drier immediately plug up the hose connections too keep moisture out.
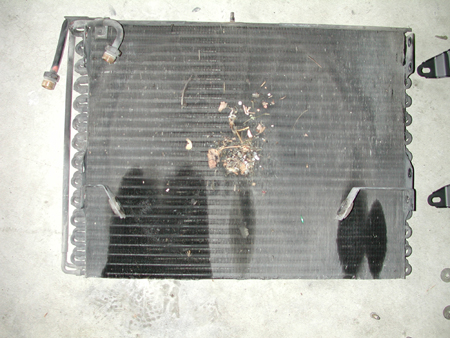
I strongly suggest you replace filter/drier along with new o-rings because if you look at my pictures you’ll see that the cause is most likely due to a failing filter drier.
Notice the rusty looking hose connection (moisture?), five pin holes in condenser causing oily stains.
Usually the cause is moisture which turns to acid in the system and eating holes through it.
Especially since I see multiple pinholes. The new filter drier says it is compatible with r12 or r134
Another reason to replace filter drier is desiccant container inside is old and may rupture clogging up your expansion valve.
I bought a new OEM condenser that came complete with brackets.
I found it was easier too use the old brackets since the condenser removal was easier if I just unbolted the condenser from the original mounting brackets.
If your buying an aftermarket condenser you’ll save some money but may have to see if the original brackets will work or if you’ll have to fabricate brackets for both mounting condenser and the auxiliary fan.
Once you remove the old fan and clean up all the garbage behind it you can mount it onto the new condenser and install the new condenser.
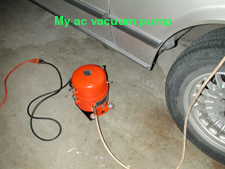
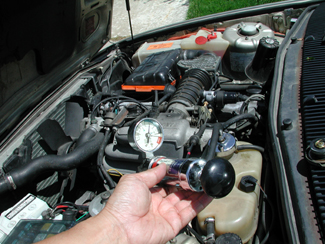
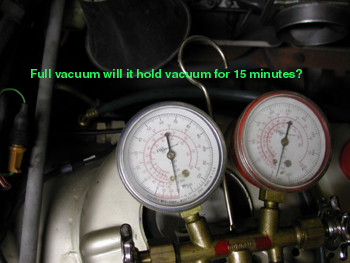
Once the condenser, filter drier, hose connections and auxiliary fan is reinstalled you can test with a vacuum pump.
See that the system will hold vacuum for 15 minutes without dropping, indicating you don’t have any major leaks.
If you don’t have a vacuum pump and gauges don’t worry you can test later but if you have a leak you may loose your freon if disassembly is required (or pay to recycle it).
Finish reinstalling the fan and radiator add a 50/50 mix of distilled water and anti-freeze till full, open the bleed screw on top of the thermostat housing.
If no air or fluid comes out remove the bleed screw and run a piece of wire through the opening till fluid/air comes out, keep filling until no air comes out of the bleed screw then tighten it.
If you hear air making gurgling noises but it doesn’t come out the bleed screw try putting your lips to the radiator cap opening and blowing through It.
Gross huh? Sometimes this method does get things moving. Consider your self lucky if you have a radiator pressure tester then you don’t have to get down and dirty. Simply pump it and you will see it purge the air out.
Your cooling system should take close to 2 gallons of liquid if block was drained.
If it has only taken 1 gallon you still have air in the system. and will require more bleeding otherwise you run the risk of over heating and blowing a head gasket.
Some times elevating the front of the car helps.
Once the motor reaches operating temperature and with the heater on check and make sure the coolant level is full. Now you can start filling the ac system.
Stant pressure tester being used below:
What’s my opinion on using BMW antifreeze versus Prestone etc.
So long as it is phosphate free I don’t believe it makes a difference accept in price.
BMW fluid is $12 a gallon versus $6 or $4 on sale for Prestone.
I find most important is changing the fluid every two years.
Resistance to corrosion is effected by the additives which wear out over time.
I now have 241,000 miles on this 85 735i and it has the original radiator which works fine on 100 degree days.
All I use is Prestone with distilled water (or the 50% diluted equivalent).
My previous car was a 81′ 528i which had 225,000 miles with over 150,000 on new rebuilt radiator I installed after I bought it.
The 528i had only 73,000 miles when I bought it yet it had a hard time cooling in hot weather.
The previous owner neglected the cooling system, leading to calcification.
Our M6 has 147,000 on original radiator and a e34 535i with 121,000 miles.
Second 535i we bought used with 77,000 miles didn’t have it’s coolant changed for 5-6 years. as soon I purchased it I immediately flushed the radiator.
Rust kept coming out and finally I gave up. Deciding to just buy a new radiator to insure its good health.
By changing the coolant regularly I’ve doubled even tripled the life of the radiators.
Do I believe in extended life coolant that go 150,000 miles? No, I’m not convinced yet after hearing feedback from others. I would still change it every 2-3 years.
Testing for specific gravity of coolant can be done with a coolant hydrometer. This test will give you its resistance to becoming frozen.
Unfortunately this does not tell you its ability to resist corrosion.
The page talked about using a digital volt meter to check amount of corrosion going on in vehicle.
You should see .1 volt while immersing probe in radiator neck and other probe to ground while all electrical items are on. If .3 volts is seen or higher serious damage can occur due to galvanic action).
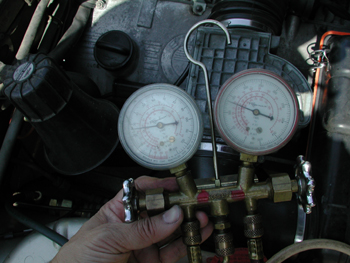
The low pressure port is located by the fire wall on the larger pipe, high pressure port is located at the filter/drier.
Evacuate the system for at least 30 minutes. If you are unfamiliar with charging an ac system leave it to a shop.
Otherwise personal injury is possible or poor charging technique may occur. Don’t charge it without pulling a vacuum.
AC will work but your system will soon be full of acid from moisture which will eat holes through everything in ac system.
After evacuation and with the engine off you can start charging the system, purge your fill hose then open your high and low gauge valves, turn the can upside down so liquid will go into the system.
Mine took the entire can of liquid Freon without having to run the engine. Check your connections for leaks with soapy water or a leak detector.
If all is well close your high side gauge valve, add more Freon after starting the car but with the can upright. I believe e23’s from 84′ on up use 44oz and before 84′ use 36oz.
If unsure fill till you see about 2 bubbles going by the sight glass per second.
Don’t fill till you see no bubbles at all this is really incorrect information since you may be overcharging the system.
You should always see a few bubbles going by the sight glass.

My pressures were about 30 on the low side and 125 on the high side with only 28oz of Freon.
Outlet temperature was 42-49 F.

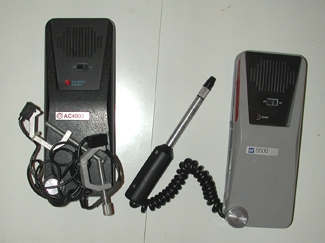
In the picture below left is a Mac tool ultrasonic filler (actually a Tiff) which is useful for vehicles without sight glass.
Ultrasonic fillers aren’t useful for r134. To the right of it is a Tiff 5500 leak detector. Do I find these useful?
The ultrasonic filler is only useful on mainly later American cars that used r12 without sight glass.
The auto industry decided to do away with sight glasses hoping to keep its owner from working on it.
But then r134 came out anyway and sight glass wasn’t useful so don’t buy one.
The sniffer is nice to have and I like it but only if you know how to properly use it.
I find a lot of negative comments about them. My observation is this is due to the average shop and person not using it correctly and under inappropriate conditions so they miss the leak.
On more than one occasion I’ve had friends come to me after paying a mechanic to find a leak, who then didn’t find a leak, then charged the system.
Only to find a few months later they are out of Freon again.
Usually I find the leak visually obvious (like 80% of the time) from dirt or stains and I’m amazed they missed it.
What really is bad was they had to pay the guy to fix the leak that he should have found the first time and pay for freon again.
This is why I try to do things myself.
Sniffer is then helpful to narrow down the location or if they cleaned up the engine compartment.
Detergent works just as well if you don’t have a sniffer use soapy water made from liquid detergent I find it works very well once you have some experience.
Go slow and learn to look for slow forming bubbles that seem to create themselves.
Once your system is fully charged enjoy it before that micro switch konks out.
Good luck and stay cool!