Article by: Winston Fong
Article applies to: all e32 and e34 models with the white lid dash cluster.
My 1990 535I instrument cluster started to fail by having the fuel, temperature, and lower digital readouts not working during the first 20 minutes of driving or until it warmed up.
My speedometer and tach did work without problems.. On a cold day it took longer to start operating, turning on the heater to defrost helped by sending warm air to the dash.
After some time the cluster completely failed. If you have this or any of the symptoms below you likely have the failing capacitor problem.
Note: this is for production dates of 2/89-09/90 later models use a different plate and before 2/89 use a slightly different plate but with similar capacitors.
I’ve also found from others on the net that the early E32’s shared the same cluster but I don’t know if the dates are the same. (My original cluster even had a e32 tag on it.)
There are four capacitors, others have said five located inside the cluster(early model). Depending on which capacitor or capacitors fail, you will have different symptoms or a combination such as:
- Language always changes to German
- Odometer and gauges switch off for a few seconds
- Trip odometer resets each time you shut off the engine
- When you leave your headlights on there is no “LIGHT?” on message: Just back light of dot matrix
- A ding when you open the door
- Fuel, temperature, and lower digital display does not work until warmed up
First do the instrument self check by pushing the black knob on the lower right down and then turning on the ignition.
Now release the knob, tach and speedo should go to the 12 O’clock position, temp and fuel gauge will go slowly from left to right then back to left side.
If only one of the gauges fails to follow through you may have a defective gauge only and not a faulty cluster.
On my car only the tach and speedo would work during the self check. After changing the capacitors everything worked.
Before deciding whether to do this job. Make sure you have a very good quality soldering iron.
Do you know how to soldier well and use a solder sucker?
If not don’t attempt this! The board is very expensive and easily damaged if you don’t know what your doing.
A new circuit board (conductor plate)will cost you about $800…
Of course if your pretty sure this is the problem you would have to pay for the board anyway.
First remove the back seat and disconnect the battery at the ground cable. Make sure you know your radio code first before disconnecting!
Wrap the cable in a plastic bag to make sure it doesn’t contact the floor or something.
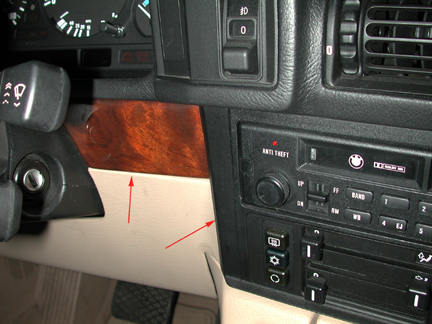
Below: Carefully pry out left wood panel from left side! Then remove screws.
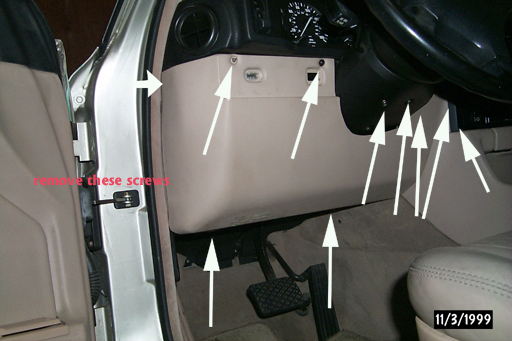
Removal left radio panel then pry wood up from left side, finish removing screws.
Disassembly of air bag is not necessary to remove instrument cluster if steering column is lowered.
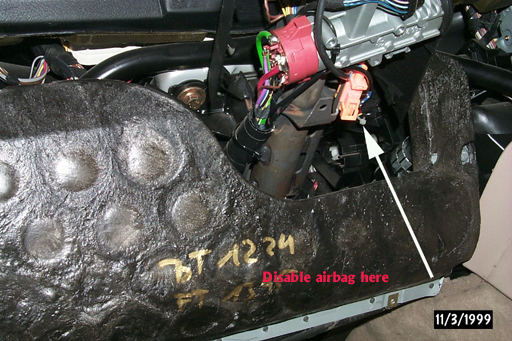
Disconnect airbag here, remove lower knee panel, unbolt column and drop it down.
Treat the airbag as an explosive at all times even when disconnected!
Do not bang on or near it! When storing place airbag face up only for your safety so it does not become a projectile if it opens.
Do not turn on ignition at anytime while airbag is disconnected otherwise this will set a fault code.
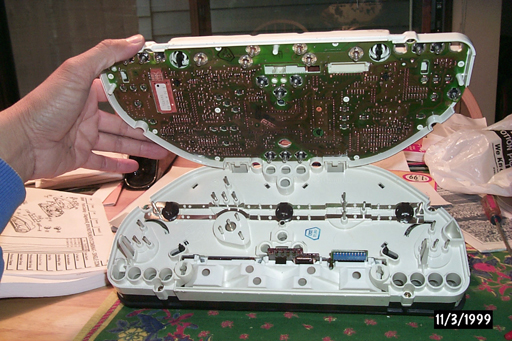
You may now remove instrument cluster by removing two screws at the top of the cluster and pulling the top of the cluster towards you.
Just reach in and undo the four release levers for each of the wire connectors and pull them out.
Turn these screws then open like a clam shell from the bottom.
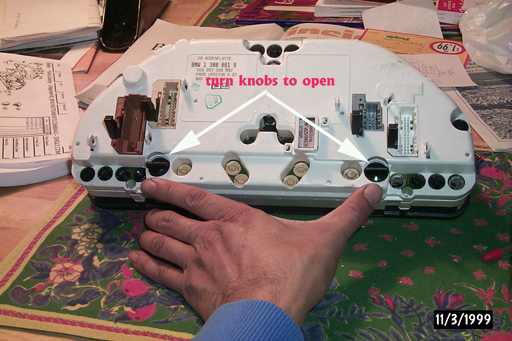
After opening separate it from it’s hinges.
You will need to cut around the cluster board mounts with an Exacto knife to extract the board.
Haven’t tried it myself but I’ve also heard you can use a pencil type soldiering iron to heat and soften the tabs as you pry them up.
If you have an early version(pre Feb. 1989)you may have tabs or screws to release board. Once you remove the board unsolder and remove the capacitors.
Use high temperature 105 centigrade replacements.
85 centigrade replacements will not have as long a life in the heat of the car.
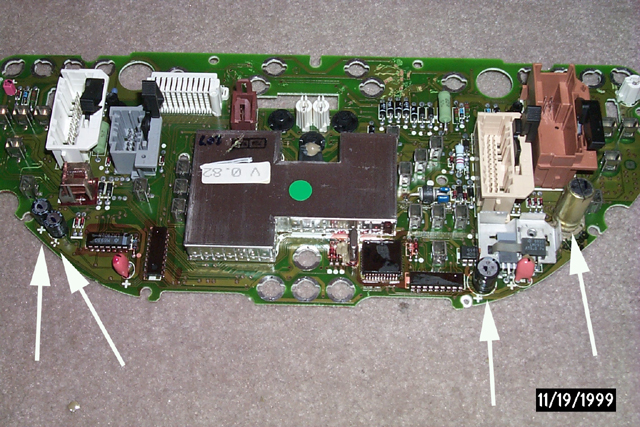
Make sure you replace capacitors + side to +side as indicated on board.
In my case only the large capacitor 1000mF 16v was defective (gold capacitor below) it was leaking the electrolytics and one leg was loose and could be moved about.
To be sure though I replaced all of them. If removing coding plug wait one minute after disconnecting power before removing it.
Coding plug retains mileage of vehicle and will have vin# printed on it if original. If yours is pre Feb 89 your coding plug will be built into the plug.
Replace these capacitors. 1000mF 16v, 220mF 16v, x2 22mF 40v You may use slightly great voltage if exact replacements aren’t available.
Now that you’ve replaced the capacitors you may start reassembly.
Remember to flip connector levers up before pushing plugs back into cluster.
I hope this repair works for you and if it does you’ve just saved yourself at least $800 over dealer.