Article by: Adam B. Hocherman
Article applies to: all e36 models.
“Disassembling the door is easy. It’s dealing with all the stuff inside that’s difficult.” -ABH
Additional (but not terribly valuable) information can be found on pp. 411-3 – 411-4 of Bentley.
Step 1: Remove Mirror Adjustment Switch
Using a flat-head screwdriver, carefully pry the mirror adjustment switch out of the door panel. Optionally disconnect the wiring harness.
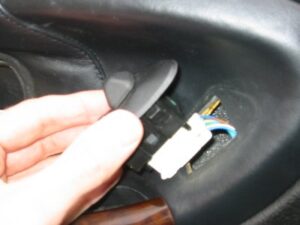
Fig. 1. Mirror adjustment switch (removed).
Step 2: Remove Inside Door Handle Trim
The door handle trim easily removes by sliding the plastic part towards the front of the car.

Fig. 2. Door handle trim removed.
Step 3: Remove Door Panel Mounting Screws
Remove the two concealing plugs from the armrest using a flat-head screwdriver. Next remove the two door panel screws using a T20 Torx screwdriver.
Step 4: Un-clip Door Panel
The door panel is secured to the door with snap-clips similar to those that hold the decorative trim to the outside of the car. Using a flat-head screwdriver carefully pry the door panel away from the steel door. You will feel heavy resistance at first and then each clip will “pop” away. Once all the clips have been popped, lift the entire door panel up and over the door lock.

Fig. 3. Removing the door panel.
Step 5: Rest or Remove Door Panel
The door panel may be completely removed by disconnecting the speaker wiring harnesses (as well as the mirror adjustment switch harness, if you haven’t already done so). Alternatively you may leave these connections in place and simply rest the door panel in the doorway as shown below.

Fig. 4. Door panel removed!
You’re done.
At this point you are ready to work on the door lock mechanism and/or the electric window mechanism.
Installation is the reverse of removal.