Article by: Adam B. Hocherman
Article applies to: all BMW e36 M3 models (and probably others).

Many thanks to contributing writer Larry Barbieri of Marlborough, MA for providing this procedure.
This procedure outlines step-by-step instructions for replacing worn or broken rubber muffler hangers on your E36 M3 or other E36-series automobile.
Refer to the tables below for the required parts and tools:
| BMW Part Number | Description | Price | QTY |
| 18201401797 | Muffler Hanger | $45.00 | 2 |
| Tools: | |
| 12mm socket | 13mm socket |
| 3" ratchet extension | 6" ratchet extension |
| Floor Jack | Penetrating Oil |
| Safety glasses | Anti-seize paste |
Step 1: Jack Car & Prepare Muffler For Removal
Carefully jack up the left rear of the car and support it on a jack stand. Once the car is supported on the jack stand move a floor jack under the muffler. Raise the jack until the jack plate is just under the muffler – don’t raise the muffler, we just want to support it so it doesn’t drop when the hangers are removed. I put the jack just behind the rear wheel, so it wouldn’t be in my way while working on the hangers.
The muffler hangers are located on both sides of the muffler, close to the rear of the car. Refer to figure 1 which shows the outboard hanger in place and figure 2 which shows the inboard hanger removed. The red arrows on Figure 1 show the two nuts that hold the hanger to the body of the car. The blue arrow shows the nut that holds a clip that connects the muffler to the hanger.
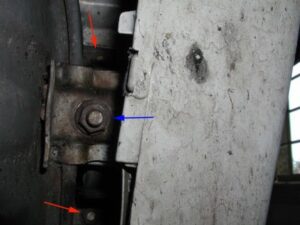
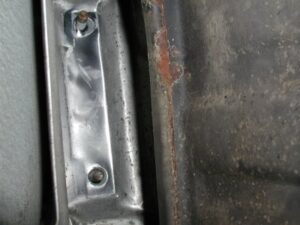
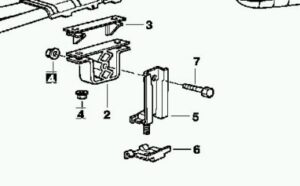
Figure 3 is a diagram (BMW Group EPC Diagram 18_0215) which depicts an exploded view of the hanger and the bracket.
Step 2: Remove The Old Hangers
Using both extensions and the 12mm socket, remove the two nuts indicated by the red arrows in Figure 1. Using the 13mm socket remove the clip nut (blue arrow). Be careful removing this nut; it attaches to a stud on the bracket (part 5 in Figure 3). It can be easily broken; penetrating oil and a little time works wonders here!
Now reach up and grab the hangers and pull them off the studs which hold them to the frame. You might have to wiggle or rock the hanger a bit to get it off. Once it’s loose you can work on it away from the car (you might have to slide the hangers towards the front of the car to get enough clearance to remove them). Also, you can now use the jack to raise or lower the muffler in order to make room.
Using a 13mm socket and a 13mm wrench remove the nut and bolt that goes through the center bushing and holds the bracket to the hanger (parts 4 and 7 in Figure 3). Using a screwdriver, pry off the metal bracket at the top of the hanger (part 3 in Figure 3).
Take note of the orientation of the hanger. The “figure 8” in the middle of the hanger is not symmetrical. There is a gap at the top of the hanger when it’s new (see Figure 4). When you slide the metal bracket onto the new hanger you must compress that gap. This action distorts the “figure 8” shape even more. The blue arrow shows the direction for the installation of the hanger (Note: The hanger in the picture is the inboard hanger). The top metal bracket that is slipped on always faces away from the muffler when you install it. Try to take note of all of this information as you perform your disassembly.
After sliding the metal bracket on, make sure all the holes on top line up. Now, insert the bolt through the center bushing and put on the bracket and the nut. Tighten this down and make sure the bracket is pointing straight down.

Step 3: Install New Hangers
Slide one of the hangers back up into position and align the studs on the body with the holes in the top of the hanger. Push it on. This might be a little hard to do because the space is tight. Once I had the hanger in place, I used my ratchet with the extension to push the hanger on and get the studs through the holes. You can put some anti-seize on the studs now before putting on the nuts.
Reach up and finger start the 2 nuts that hold the hanger. Use the ratchet and 12mm socket to tighten these down. Now, you have to install the two clips to the stud on the hanger bracket. Again, use anti-seize here. The lower part of the clip sandwiches the edge of the muffler between it and the upper part of the hanger bracket. This is where it may help to use the jack to raise or lower the muffler so you can work with it easily. I found it best not to raise it too high because you can’t move it after that. If the muffler is dropped down just an inch or so you can put on the clip, finger tighten the nut and then use one hand to push the muffler into position while you tighten the nut with the ratchet and 13mm socket. Get both nuts on first then do the final adjustment and tightening.
When you are done there should no movement of your muffler in the vertical direction when you apply force to the tail pipes. Horizontal motion should be no more than 1/4″.
Great job!
Afterword: Larry’s Saga
No good repair goes unpunished!
I tried (foolishly) to remove one the clip nuts without using penetrating oil. Naturally, it sheared off the stud. I tried to get a new part from the local BMW dealer, but they don’t stock it. I left the muffler with one hanger, thinking I would have to wait until next week to finish but after a few hours, I decided to try to fix my error.
I used my Dremel and a hacksaw to cut the ‘head’ off the stud. Then I use my Dremel to grind down any uneven metal left by the hacksaw. I clamped the bracket and put some vise grips on the stud and twisted, bingo, out it came leaving a nice clean hole. I made a quick trip to the local hardware store for an M8x40 bolt, nut and washer.
I put some JB Weld under the head of the bolt, passed it through the bracket and then installed the clip and nut holding the top of the bolt as I tightened with a 13mm open end wrench. Hopefully the JB weld will set up an by the next time I have to do this and I won’t need the open end wrench.
After I broke the first stud, I sprayed the second one with penetrating oil and let it sit for 15 minutes or so. This time I gently loosened it, making sure not to break it and going very slowly until I was sure the nut was turning. I was stupid! I know better than to try to do exhaust work, or any under carriage work without penetrating oil. Damn, I was mad but, I was thrilled when I was able to fix it without too much hassle and for only $2.25 (I bought stainless steel hardware).