Article by: Winston Fong
Article applies to: All models with the M30 engine.
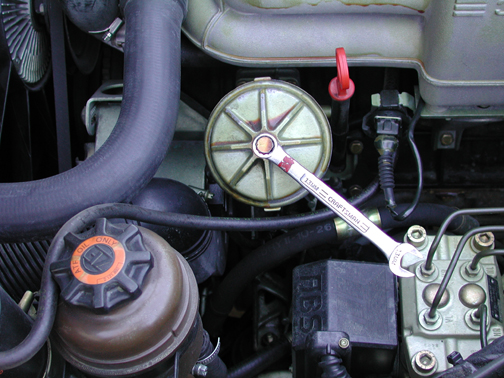
Unbolt the oil filter lid.
Editor’s Note: The early M30 engines had a different oil filter canister than what is shown here. Location of M20 filter canister is different from the M30 as well (located near the exhaust manifold).
The canister for the early models have a bold on top that allows a hanging canister to drop down (instead of removing a lid from the top).
I recommend using some shop towels to catch an oil released.
~ M. Oswald
Pull the bolt part way out, while holding the lid down for 30 seconds with your fingers to prevent oil from leaking out the sides.
This allows air to come in and drain canister.
After 30 seconds enough oil should drain that you can remove your fingers.
Next remove the oil drain plug, while the filter canister is draining.

After it drains replace the drain plug.
Remove and replace the 2 o-rings from the lid and bolt.

Next remove and replace the filter.

Replace the lid with new o-ring and tighten lid. Fill with 5 1/2 qts. of oil.
Start the engine and let run for a few minutes while checking for leaks.
Check oil at red dipstick seen in picture above.
Additional Article by: Paul Axford
Applies to: all models with the M20 & M30 slant six engines (this article was written with a 730i).
The wisdom of many other BMW owners on the web indicates that this engine does not measurably benefit from the use of synthetic oil. Good thing too as the stuff is super expensive down under.
The BMW dealer that was maintaining this car used Castrol GTX Protec 15W-40. This is a heavy oil by current automotive standards, but if you refer to the owner’s manual you will see that this is the correct grade for common ambient temperatures.
Also, since this engine does not have hydraulic valve lash adjusters there is no need for a thin oil.
The GTX Protec is rated API SL, the current standard, but the label says it’s recommended only for cars made between 1980 and 1990. So what’s missing?
Many petroleum oils on the shelf in NZ seem to be classified by decade of manufacture which leads me to think there is more to this story than meets the eye.
I don’t recall such a classification in the US. Perhaps it’s only referring to the relatively-high viscosity.
I waited till the scheduled oil change interval (142,000 km) before doing this the first time myself.
The job is about as easy as it gets, but I did learn a more optimum procedure:
- Wrap a rag around the oil filter housing to catch spillage.
- Loosen the 13mm screw head just enough to break the seal on the cover. A tablespoon of oil will escape – mop it up but leave the cover loosely in place.
- Remove the 17mm sump drain plug and allow the oil to drain for at least an hour, preferably into a container.
- Wipe clean the washer contact area around the sump drain plug.
- Replace the sump drain plug using the new copper washer supplied with the new filter (otherwise first heat up the old washer in a gas flame to soften it).
- Remove the filter cap, lift out and discard the old filter. The housing should now be almost completely empty of oil.
- Replace the small O-ring at the end of the filter housing screw and the large one under the cover with the new ones provided with the new filter.
- Install the new filter with the part number marking facing upward. Before replacing the cap pour new oil all around the filter to “wet” it. Use the new washer provided under the head of the long retaining screw.
- Tighten gently to about 14 lb-ft while holding the cap approximately centered.
- Pour four or five liters of new oil into the engine and replace the filler cap temporarily.
- Start the engine and run for a few minutes to fill the oil filter housing. Let it stand for 5 minutes before adding oil to bring the level to the full mark on the dip stick. The total oil capacity is specified to be 5.7 liters.


Resetting the Service Indicator:
After your oil change, or when it becomes otherwise necessary, you will need to reset the dashboard service indicator.
Open the hood and locate the service receptacle near the firewall. Remove the cap and look at the pin numbers next to each individual socket.
Place a 390 to 1k ohm resistor (or less-preferably a wire jumper) across pins 7 and 19. Double-check the pin numbers before proceeding.
Switch the ignition key to the “on” position without starting the engine. After 3-5 seconds remove the resistor (or jumper) and then switch off the key at your convenience.
If an “inspection” indicator is lit, wait 12 seconds to perform a reset of both “oil” and “inspection.”
Replace the receptacle cap.
Editor’s Note:
Mobil 1 Full Synthetic along with a PTFE additive (as pictured below) has been my choice for extending the life my BMW engines.
Typically, I choose the weight of oil based on the climate / seasonal conditions. For example, as I live in Las Vegas, Nevada, summer temperatures can reach a balmy 120 F.
During this period of time, I would go with a 20w 50 weight while during the winter my desired weight would be 10w 30.
Also note that these engine have rockers and not lifters, so a super light-weight oil is not needed – and is more protective of engine bearings and rings.
Do not use a PTFE additive in any engine that isn’t broken in (new rings will not seat).
~ M. Oswald
