Article by: Olin Johnston
Applies to: all models with the M60/M62 engines.
This is a reasonably straightforward, but occasionally frustrating engine repair job that can be done by anybody as long as they are patient. I worked at a very leisurely pace, doing each side on separate days, but this job can be done in a matter of hours if need be. Only basic tools are required, and the car does not even have to be lifted off the ground. There are TONS of DIYs on the web for this job, but there are some minor E31 considerations, and I am including a lot of small details that most leave out.
Tools required:
- Small and large flat head screw drivers
- Ratchet driver
- 10mm socket
- 10mm box wrench
- Reaching magnet (I needed this a few times during this job)
- Brake parts cleaner
- Paper towels
- Nitrile gloves
Parts required:
| BMW Part Number | Description | Price | QTY |
| 11129069871 | Valve cover gasket set (cylinder 1-4). Genuine BMW. | $50.31 | 1 |
| 11129069872 | Valve cover gasket set (cylinder 5-8). Genuine BMW. | $50.31 | 1 |
| 11121437395 | Rubber seal. Genuine BMW. | $2.09 | 6 |
| 11121747162 | Nut/washers with rubber seal combo. | $20.10 | 6 |
Also needed:
Black RTV sealant (oil resistant/high temp)
I highly recommend saving this project for when your car is due for an oil change. Even if you are very careful, there will be a considerable amount of very small contaminants released into the engine, such as particles of the old flaking finish, small RTV bits, trace amounts of brake cleaner, and general dust/dirt that comes from disturbing the valve cover and exposing the engine.
Let’s begin…
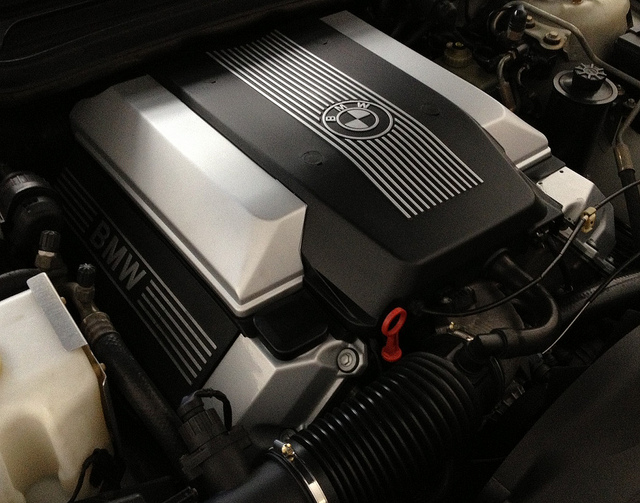
1. Remove the top acoustic cover and sound insulation. Pay attention to the cruise control throttle cable at the front and the sound insulation tucked in at the rear.
2. Remove the spark plug covers on each side. There will be a lot of loose hardware soon, so start organizing each type of nut, bolt, etc. and label them if you need to.
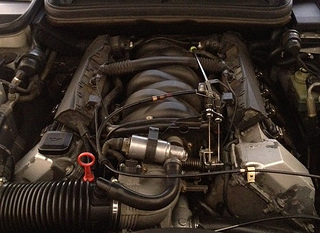
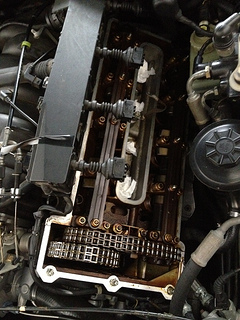
3. Remove all 8 ignition coil packs using a 10mm socket. The electrical connections are removed by prying the metal retaining tab upward. They should pull right off the spark plugs once the nuts are off. Remember to unhook the grounding strap from the center valve cover stud on each side. (After this point I decided to work on each side individually.)
Start with the driver’s side (cylinder 5-8); the reason being there is much more room to work with. You will have practice before you get frustrated trying to work around the E31’s hard AC lines and short-slack fuel injector wiring box in your way on the passenger’s side.
4. The fuel injectors and ignition coils are fed by a box of wiring that is secured by two 10mm nuts at the top. To get it out of your way, unplug each electrical connector from the back of it (you can leave the big round one at the rear) and either mark or remember their orientation. They are easily undone by pressing down on their metal clips. There are some differing opinions on how to release this wiring duct from the fuel injectors, but I just removed the two 10mm nuts from the brackets, and pulled it straight toward me. This may be difficult if all injector clips are present. Some people choose to reach in and undo each tiny clip first, but this is not necessary. Just don’t twist them or yank on one side too hard. Ensure that the tiny metal clips are positioned on the injector harnesses correctly upon removal. Once the wiring box is free, you can tie it out of your way to something on the other side. Remove the rectangular gasket for the ignition coil cover.
5. Undo all 11 nuts securing the valve cover to the head. The nuts can either be loosened with the 10mm socket or the box wrench where the socket cannot reach. Be careful to collect each washer as well. If they are stuck onto the rubber grommet, a large flat screwdriver prying gently from the inside edge will easily release them. Plus this approach will catch them from falling into the engine bay. You can also pull out any loose rubber grommets so they don’t fall anywhere.
6. You are now ready to remove the valve cover. Before you start pulling it off, protect each spark plug well with a small wad of paper towel to keep all the flaking coating and crumbs of dirt out. At this point, tuck the grounding strap down so that it does not interfere. Wiggle and tap the valve cover. It will be pretty stuck on. You can pry it off gently from the front, but take care not to scratch or gouge the metal surface of the head or the valve cover if you are reusing it. Once you have an edge free, you can slowly peel the valve cover and old gasket off. Be sure to wipe out any dirt particles you can reach from the valve train. A tiny bit is inevitable, and will be caught by the oil filter or flushed out with the oil change, but get out what you can see.
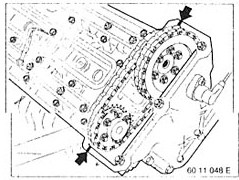
7. Using brake parts cleaner sprayed onto a paper towel, completely clean the surface of the head where the gasket will be laying around the perimeter and around the spark plug cavity. Use your fingernail or a very carefully held razor blade to gently clean off any old RTV sealant from the front timing cover seam and “half moon” sections at the rear. Again, be careful not to scratch the surface. You can also use this opportunity to clean the spark plug wells if they are oily like mine were. I even had to remove plug #3 and #4 to get it totally cleaned of leaked oil. This step actually took me the longest because I was compulsive about having it 100% free of residue.
8. When installing the new gaskets onto the valve cover, BMW recommends coating the edge with glycerin so that they “float” in the seal groove on the cover. The idea being so they do not chafe the gaskets under vibration. For mine, I just thoroughly cleaned the inside of the refinished covers and “seasoned” the inside of them (including the seal groove) with some fresh synthetic engine oil. The gasket should be laid into the cover so that there is no tension on it. Do not run your finger along the length of the gasket to seat it. Instead, press it in at the corners first, and then gently press it into the entire seal groove. This ensures that there is no stretching of the gasket.
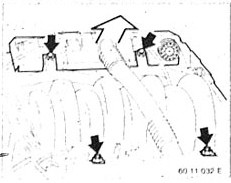
9. I decided to do a test-fit without applying the RTV so I would know how to orient the cover when fitting it back into the space, and also to feel how the less-visible areas on the back would rest. Once you get a feel for how it will be installed, apply a small amount of the RTV sealant along each of the seams at the front as well as the corners of the “half moons” at the rear. There should be 6 dabs of it total. There is some work-time with the RTV, so slowly get the cover into place and lower it straight onto the studs, paying particular attention to the rear half moon seals. An extra set of hands is very useful for this step. Once it is down all the way, run your finger along the entire perimeter and closely inspect the gasket to make sure it has not folded or come out of its groove during installation. Don’t forget the one around the spark plugs too.
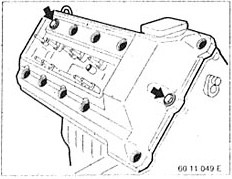
RTV goes on corners of the half-moons, and on the front seams here:
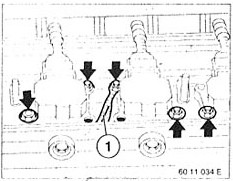
10. Loosely install a rubber seal, washer, and nut onto the center front and top rear studs. These are the alignment positions. Inspect each stud opening to ensure that the cover is properly aligned with the cylinder head. Secure these nuts further but do not tighten them fully.
Alignment nut positions:
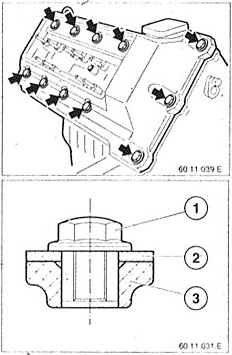
11. Attach without torque the rest of the seals, washers, and nuts. Once all are in place, tighten them crosswise, radiating outward from the center. The official torque spec is 10Nm, but the new gasket and washer seals will be thick and elastic. My torque wrench does not go that low anyway, so I tightened them by hand, with a very modest grip. You should feel a “natural stopping point” and the rubber seals will bulge just a bit beyond the washers. Over-tightening can cause leaks, or damage to the rubber grommets.
12. Reinstall the rectangular ignition coil cover gasket. Then re-secure the injection wiring box and 10mm nuts. Remember to attach all the electrical connectors that were unplugged, paying attention to exactly where they came from.
13. Clean and reinstall the ignition coils, remembering to reinstall the central grounding strap first.
14. For the passenger’s side, steps 4 through 13 are the same with a few considerations: First, the injector/ignition wiring box will not move very far out of the way since it is attached to the E-box etc. You also must also unplug the throttle position sensor, MAF sensor, idle-control valve, and intake air-temp sensor to gain some slack on it. Second, the top half of the air filter housing, air filter element, MAF sensor, and intake boot must be removed. Otherwise, you will not be able to get the valve cover out. To fit the replacement, I found it easiest to raise the injector box up as high as possible, guide the valve cover in from the front on its side (to clear the AC lines) and then slowly fold it down onto the studs. Since there is so much articulation needed to install it on this side, check and double check that the gasket has not shifted, and that it is evenly visible all the way around. On mine, the gasket had come out of the groove on the lower side, and was not immediately apparent. I ended up having to redo it.
15. Once everything except the plastic covers is in place, recheck to ensure that everything is installed and secured correctly, especially the several electrical connectors that had to be undone. If sufficient time has elapsed that the RTV is solidified, start the engine to verify that everything is working. While idling, run your gloved finger over the seal to check for obvious leaks.
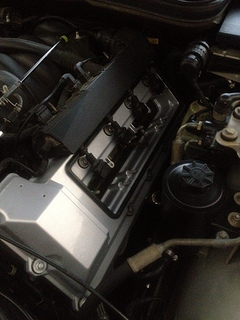
16. Reinstall the sound insulation and all protective covers.
17. After a few miles of test-driving with no leaks confirmed, change the oil and oil filter to remove any contaminants from the job.
Enjoy!