Article by: jmciver
Article applies to: written for the E36, but applicable to all BMWs.
Want to start your car in a different way? See how I installed a Z8 Engine Start switch. Now you can use a button to start the car instead of the key.
DISCLAIMER:
This modification is to be followed and used at the sole risk of the individual performing it. When performing any modifications, there will always be the risk of damage to the car.
MODIFY AT YOUR OWN RISK. Read the procedure carefully and be sure that you feel comfortable with the modification before you begin.
Now on to the fun stuff!!
Getting Started:
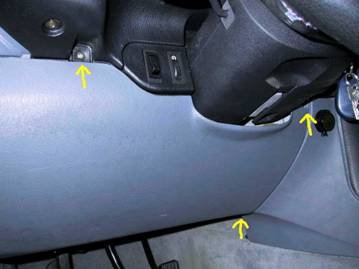
Before you begin, you must first remove the driver side lower dash panel and knee bolster. The dash panel is held in place by three screws. Once the screws are out, use care when removing the panel.
The knee bolster (not pictured) is held in place by three bolts and is located just behind the dash panel. You should also remove the OBC and sun glass holder now.
To do so, place you finger in the hole under the OBC as shown. Pull back towards you and slightly upward until OBC pops out.

Wire Locations:
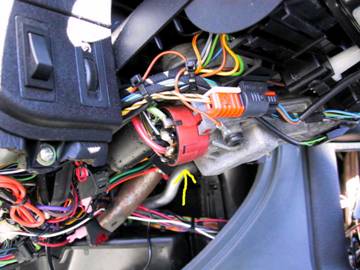
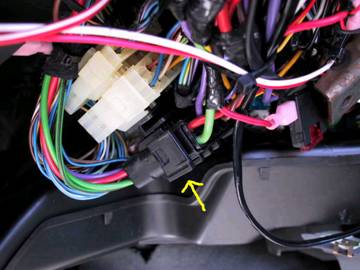
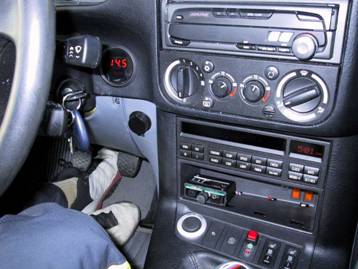
These shots show the ignition harness on the steering column and the harness under the dash (bottom). The wires that will be tapped are the green one and the black/yellow one.
Some cars may have a green/black wire instead of a black/yellow one on the ignition harness. The green wire of the kit is tapped to the green wire of the BMW harness.
The yellow wire is tapped to the black/yellow wire of the harness. This configuration will allow you to start the car with either the button or the key.
To start the car with just the button (which is what I did), cut the black/yellow wire on the IGNITION side of the wire tap you made (that is the side that goes to the key).
Be sure to tape off both exposed ends of the black/yellow wire.
Z8 Switch Mounting Hole:
Disconnect and remove the lighter by pushing from under it, it will pop out. Using a Dremel tool, widen the opening to fit the switch.
Be sure to check for proper fit frequently. If you make the hole a bit too big, the switch can be held in place by some glue.
Otherwise, the switch will snap in and should fit snug in the hole.

E-Brake Safety Feature:
This kit has a nice safety feature that won’t allow you to use the button to start the car unless the e-brake is engaged.
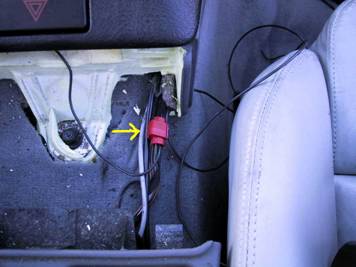
Pull up the e-brake handle boot to locate the grounding wire, it should be a brown/green wire. To keep the wire run short, I chose to tap the wire just behind the hazard light switch.
I had to remove the center console and the base of the center console to get to the wire. To remove the base of the center console, there is a single screw under the rear ash tray.
If you don’t want to use the e-break safety feature, just ground the black wire anywhere.
Accessory Power:
Although I never used the cigarette lighter for smoking, I did use it for accessories (cell phone, etc). Since I did not want to lose this ability, I bought an accessory power adapter from Radio Shack.
I then cut a hole using a Dremel tool and mounted it where you see it. I tapped it to the original lighter power wire to ensure the proper fuse was used for the power outlet.
Although you can’t really see it here, the relay from the start button kit is mounted just below the accessory outlet.

The Finished Product:
And here it is. Special thanks go out to Kosta Kritikos for making me the start switch kit.
Make Your Own Start Switch:
So you think you can make your own start switch? It actually isn’t that difficult. It pretty much consists of a relay and a momentary contact switch.
You don’t have to use a Z8 switch, any momentary contact switch will work. Below are the parts (and associated part numbers) for the kit installed in my car.
| BMW Part Number | Description | Price | QTY | Sub-Total |
| 61318377343 | Z8 Start Switch | 1 | ||
| 61130006665 | Contact Pins | 2 | ||
| 90886387160 | Connector for Contact Pins | 1 | ||
| Total |
The wiring schematic is pictured below:
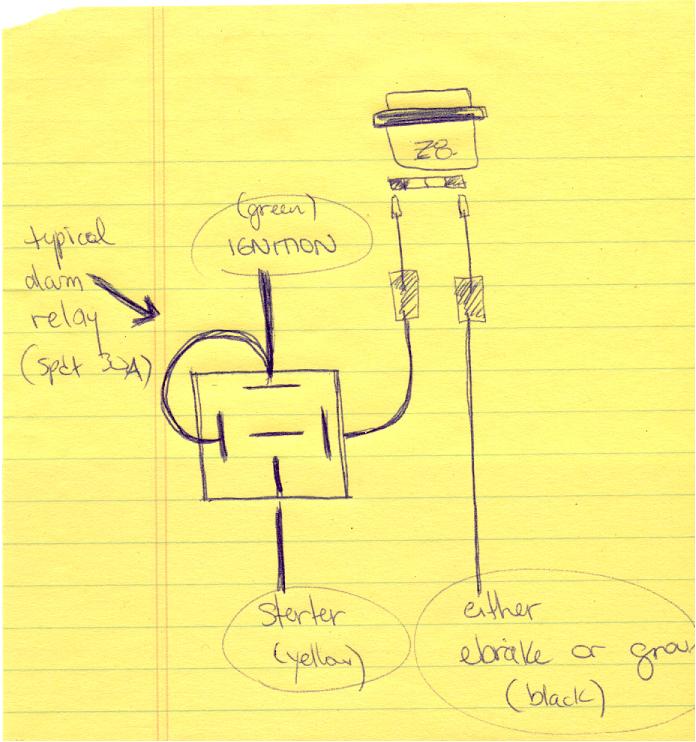
The contact pins and connector make the mini harness for the back of the z8 switch. The pins go into holes #1 and 4 of the connector, the middle holes 2 stay open.
The contact pins come with these green rubber things attached that need to be removed and re-crimped.