
Article by: ArbysNight
Applies to: All BMW models with the M62 8 cylinder engine.
BMW 740 Belt Replacement for 4.4L V8 (M62 Engine, E38 / E39)
This procedure was developed by a non-mechanic working on his own 2000 740i Sport.
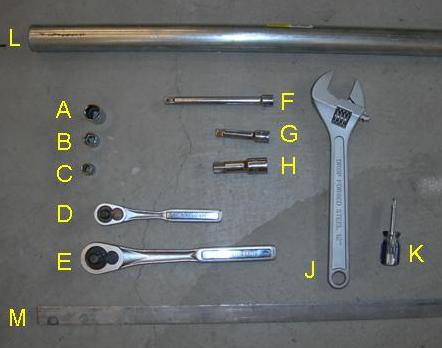
A – 17mm socket (1/2 drive)
B – 13mm socket (3/8 drive)
C – 10mm socket (3/8 drive)
D – 3/8” ratchet
E – 1/2” ratchet
F – 3/8”x6” socket extender
G – 3/8”x3” socket extender
H – ½”x3” socket extender
J – Large adjustable wrench (1.50” capacity) -or- BMW special tool 11 5 040
K – Phillips screwdriver
L – Breaker bar that fits over adjustable wrench and large ratchet (optional)
M – Home-made water pump pulley holder (Step 3) -or- BMW special tool 11 5 050.
Procedure:
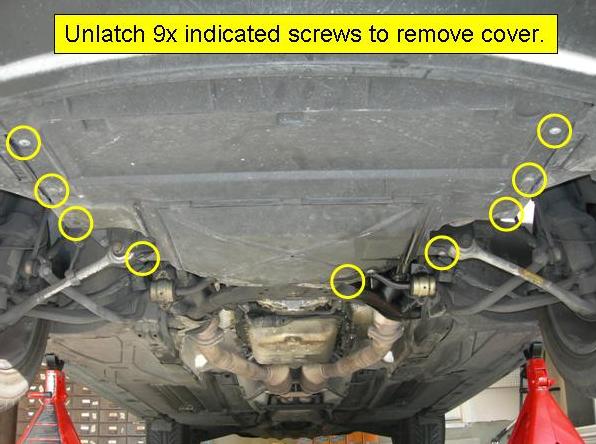
1. Remove the cover from the bottom of the engine with a Phillips screwdriver. The screws take about one turn to disengage and do not come out of the cover. I put my car on jack stands to give me some extra working room, but this is not absolutely necessary.
2. Before you replace anything, it’s a good idea to make sure you need to replace anything… I certainly needed a new main belt. In addition to the clearly obvious cracks below, I’ve had a tick-tick-tick from my engine for about 6 months. I confirmed the noise was from the belt by drawing a line across the belt with White-Out. Then, I ran the engine and heard/saw a distinct synchronization of the tick-tick-tick noise with the passing flash of the white line. My AC belt seemed pretty good (no cracks), but I figured I’d replace it anyway.
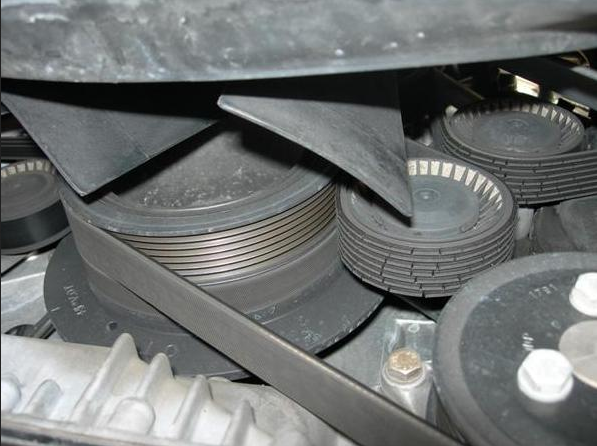
Looking upwards from the front of the engine – from under the radiator. Belt replacement is indicated by severe cracking.
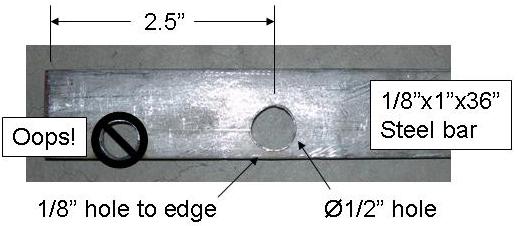
3. While you can buy a purpose-made tool to hold the water pump pulley, you can easily make one at home. Go to Lowes or Home Depot (or the like) and get a steel bar 1/8” thick, 1” wide, and 2+ feet long. Drill a 1/2” hole as shown below.
4. On the left side of the engine (as pictured), place the hole in the special tool over one of the water pump pulley hex heads so that the 1/8” web is toward the nut (it’s the only way it will fit). Make sure the special tool is firmly positioned against the pulley and in command of the hex. Turn the fan nut clockwise to loosen the nut. The fan threads are special left-hand threads that do not obey the classic lefty-loosey, righty-tighty mentality. Make sure you treat the plastic fan blades with respect. It is possible to damage – but not break – the blades so that when you reinstall the fan and run the engine the fan can explode.
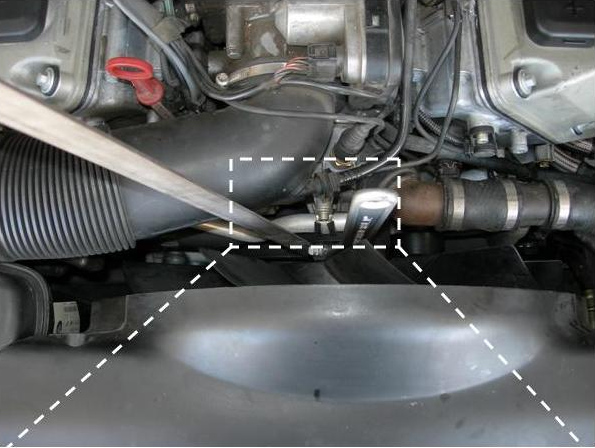
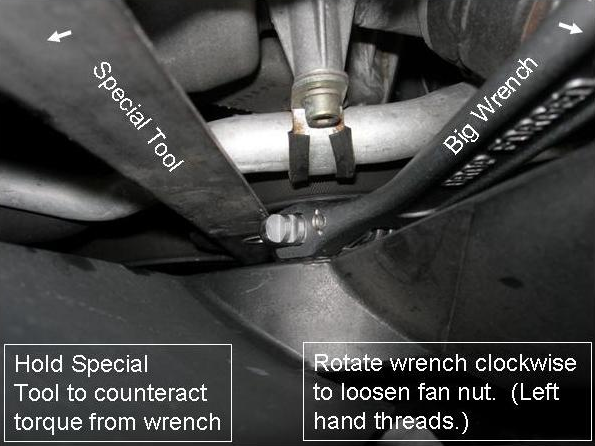
Looking straight down on fan from over the radiator.
5. Without dropping the fan, loosen the nut until the fan is separated from the engine. The fan needs to be removed by lowering it out from the beneath the car, so gently set the fan down inside the radiator shroud so that you can reposition yourself. Lie down on the ground in front of the car and carefully remove the fan from the car. It’s probably a very good idea to meticulously inspect the fan blades for any signs of cracking. You should also check the fan clutch to make sure it still turns smoothly and freely, albeit with a heavy viscous drag. Both my fan and viscous clutch seemed fine (knocking on wood as I type).
6. Locate the main serpentine belt tensioner just behind where the fan just was. Use a 13mm socket and extension to loosen the two bolts indicated below. These are not particularly tight, but once you loosen them, the belt tension will be immediately relieved and there might be a popping noise as the tensioner smacks into the engine’s main balancer pulley.
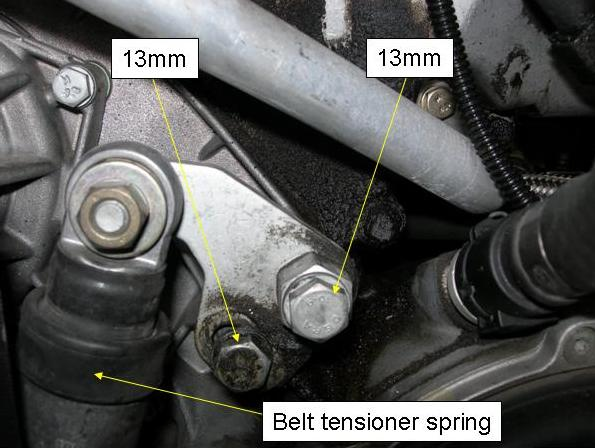
Large belt tensioner, Picture taken “through” radiator. Loosen both 13mm bolts to relieve force on belt tensioner spring (picture taken with tensioner loose).
7. By lying under the front of the car, remove the belt from the engine. If you are planning on putting the belt back into the car, the TIS recommends that you mark the direction of rotation on the belt so that it can be reinstalled in the same direction. As you can see, there is no risk of me reusing my old belt. Holy cow!
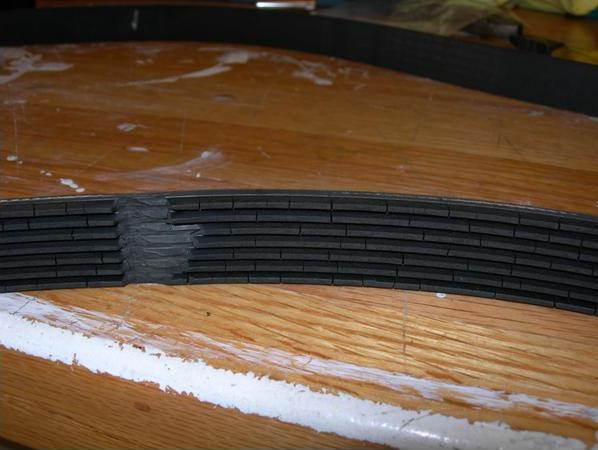
Wow, now I know what was making that ticking noise!
8. If you’re replacing the AC compressor drive belt as well, it’s time to loosen its belt tensioner. The AC compressor belt tensioner is very obvious under the front of the car. Loosen the 13mm bolt, then the 10mm bolt to relieve the force, just like you did for the main serpentine belt.
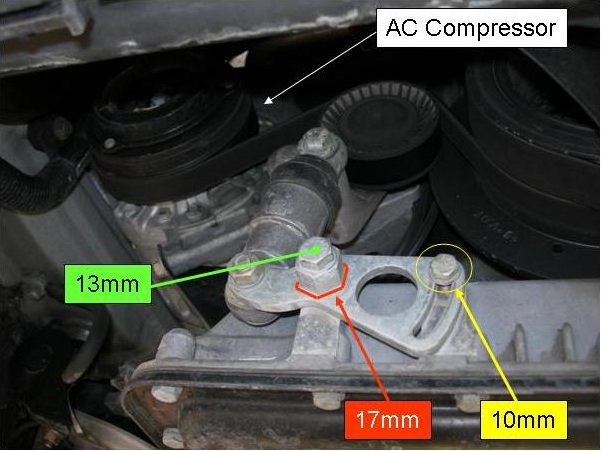
Looking up from the front of the engine – from under the radiator. Belt is under tension.
9. Remove the AC belt from around the compressor, idler, and engine. As I mentioned earlier, my AC belt looked fine and I probably could have lived with it for many more miles, therefore I have no egregious pictures of a truly worn belt.
10. Install your new AC belt, routing it just as the old one was. The AC compressor pulley is straightforward and easy to get the new belt centered. The main engine pulley has two sets of grooves: the rearmost set is for the AC belt and is separated from the main serpentine path by a taller rib. Make sure the AC belt is riding in the correct set of grooves and the belt is centered over the compressor pulley. The idler pulley should be pushing into the back (smooth side) of the belt, just as pictured above.
11. The belt tensioner is very easy to set up. Pre-tighten the 13mm bolt, just enough to take up play but not so much that you can’t turn the tensioner. Use your 17mm socket to turn the large, cast-in-place hex (shown in red in the previous illustration) clockwise until the 10mm bolt bottoms out in the slot. Most of the travel will be simply moving the idler into contact with the belt, but the last fourth of travel will be used to compress the spring in the tensioner, so it’s a bit tougher. With the 10mm bolt bottomed out against the top of the slot, tighten securely*. Remove your 17mm socket and securely tighten the 13mm bolt*.
*Often, the TIS does not give tightening torques for various screws. In most cases, the TIS recommends tightening torques based on screw size and strength rating. Unless there is a specific reason to tighten a screw to a given torque value, most manufacturers and guidebooks recommend torque values for screws that create a nominal amount of tensile preload in the screw body. Anyone who has worked with screws and bolts before knows what tight feels like… and that’s what the torque values usually represent. Long story short, tighten the bolts until they’re tight, keeping in mind that over tightening could strip the threads or break the bolt, and under tightening could result in the belt tensioner slipping.
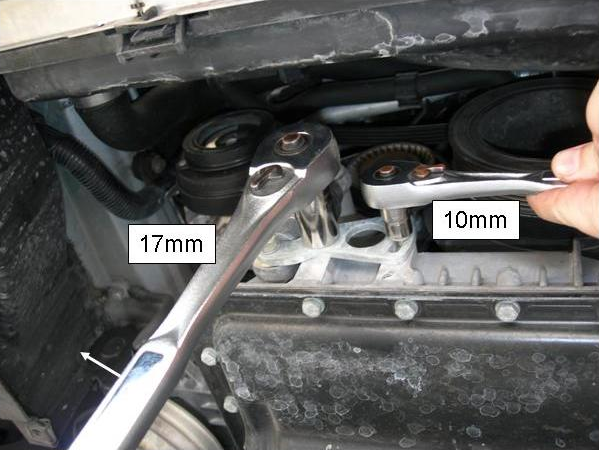
Semi-tighten 13mm bolt (under 17mm) to take up play. Turn 17mm cast in hex clockwise until 10mm bolt bottoms out at the top of the slot. Tighten both the 10mm and 13mm bolts.
12. Install your new main serpentine belt as shown in the diagram from the TIS (below). The belt takes quite a few twists and turns, so make sure you’ve followed the diagram. I found it easiest to install the belt by lying under the front of the car. Make certain that you’ve properly located the belt in all of the pulleys so that the grooves match up. All of the ribbed pulleys have large outside lips that you should be able to see next to a properly installed belt. If your belt looks like it’s teetering on the edge of a pulley (or if you see an “extra” groove in the pulley), you need to reposition the belt.
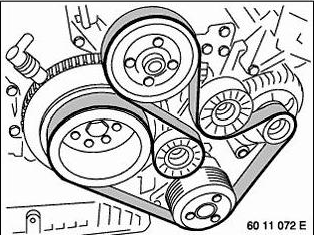
Belt routing diagram per the TIS.
13. The belt tensioner for the main serpentine belt is analogous to the AC belt, but access is more difficult because it’s not as easily visible. I used my 1/2” ratchet with a 3” extension and 17mm socket to turn the cast-in-place nut. I used my 3/8” ratchet with a 6” extension and 13mm socket to secure the tensioner once forced into position. Start by tightening the pivot bolt “A” to take up play, but not so tight as to inhibit rotation. Then, turn the 17mm cast-in-place nut counter-clockwise to bring the “B” bolt to the top of its slot. This belt tensioner seemed to require much more force than the AC belt, so I had to use an extension on my big wrench to turn the 17mm hex. Once the belt tensioner is loaded, tighten the 13mm “B” bolt securely. Remove the 17mm wrench and tighten the 13mm “A” bolt securely. I found that when I removed the tension with the 17mm wrench, the belt tensioner seemed to relax a bit. I suspect this was because I didn’t properly pre-tighten “A” enough. The TIS lists the tightening torques for the two 13mm screws based on screw strength and build date (see explanation in Section 11): 22 Nm for up to 9/98, 30 Nm for 9/98 and after. I didn’t use a torque wrench, so if my belts start squealing we’ll know I didn’t tighten the bolts enough.
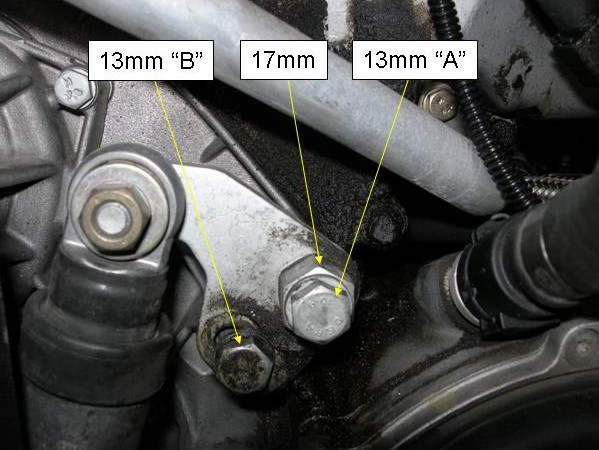
Large belt tensioner, picture taken “through” radiator. Semi-tighten 13mm “A” to take up play. Turn 17mm cast-in hex counter clockwise until 13mm “B” bottoms out in slot. Tighten “B” and tighten “A”. Picture taken with tensioner loose.
14. Reinstall the fan by inserting it up from underneath the car. It is safe to handle the fan by the blades provided you don’t apply excessive force to them. Just to play it safe, pretend the fan is coated in old TNT and you should be fine. Once you get the fan into position on the water pump pulley, turn the fan by the blades to get it started on the threads. After about half a turn onto the threads, you’ll need to use your big wrench to turn the nut. Once the nut is tight, install your special tool, but this time on the opposite side of the pulley. Use your big wrench and tighten the nut by pushing it counter-clockwise. Remember, the fan uses left handed threads, so you’ll feel like your pushing backwards. The TIS recommends a tightening torque of 40Nm, but unless you have their special tool there’s no easy way to use a torque wrench. In this case, I ball parked 40Nm with muscle strain.
15. At this point you’re basically done, but before you reinstall the bottom cover you should give things a once over: Make sure the belts are properly routed, properly seated, and properly tensioned. Make sure the fan has been reinstalled, tightened, and not damaged. You may wish to start the engine to listen for noises. Make sure when you first start the engine you are not standing next to, over, or under the fan. If you happened to damage the fan during removal/installation, it may come apart when you run the engine. For that matter, I make it a point to NEVER be in the explosion path of the fan whenever the engine is running.
16. Once you are comfortable that everything looks good, put the cover back on the underside of the engine and take the car down off your jack stands. You’re done!