Article by: Gerry at PhoenixMotorsport
Article applies to: all E31 models.
It’s been a busy day today with the removal and refitment of my front seats. The main reason was to rectify my reversed seat and mirror operation but a little housekeeping was done at the same time.
Clearly my drivers seat is on the correct side of the car and all the pics are whilst doing the drivers seat, so if yours is incorrectly on the left, just cut all the pics and reverse them.
There are a couple of warnings on the way to watch-out for too.
Firstly, to allow a decent grip on the front of the seat, remove the front seat trim by using the trim tool to extract the plastic trim clips . . .

. . .which allows access to the two attaching phillips screws.

This trim panel can now be removed.
Tip the seat back as far forward as possible and run the seat as far back as it will go to expose the two front TX45 bolts holding the seat to the floor.

Now run the seat fully forwards to expose the FOUR rear seat to floor mounting bolts, again TX45’s.

The seat will now no longer be attached to the floor but it is stopped from sliding around by two large pins to be seen later.
The seat now needs to be lifted about an inch to clear the pins and then moved forwards slightly.
Looking under the seat from behind, raise the seat mechanism as far as it will go and then unplug the multiplugs underneath between the seat and the floor. (Four in my case).
You may need to remove a hard plastic shield from under the seat to get access to the wires, this seen in better detail later.
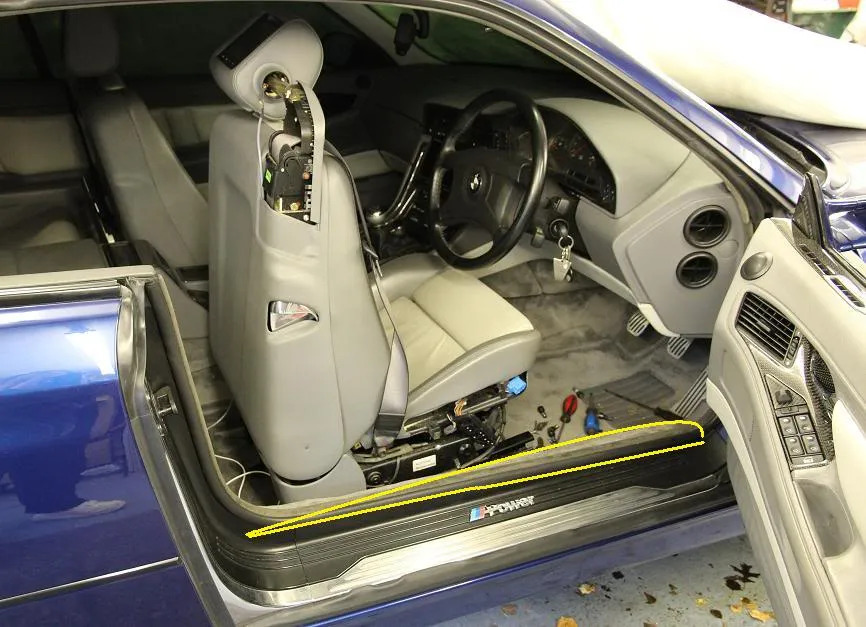
Now remove the door sill trim as this is very easily scraped when pulling the seat out.
At this point, if you want to remove the headrest, rotate it fully forwards and whilst rotating slightly backwards and forwards, push it in to the middle of the car and it will slide off.
You will not have any wires to contend with.

If you are servicing or replacing a broken seat tipping handle, you can release the rear headrest support shell by using a small spike in the hole as shown which will release the clip circled and allow the cover to pull off.

Now, lift the seat so that the switch panel and lower seat back trim screw are clear of the sill.
Removing the screw cover, and then the TX20 Torx bolt (NOT SELF TAPPING) . . .

The seat back can then be pulled backwards far enough to expose the attachment screw for the notorious plastic handle.
I have used billet alloy ones but you should ensure for safety sake that you have the steel reinforced modified ones from BMW.

WARNING, THE NEXT BIT NEEDS TO BE DONE IN ABSOLUTELY THE CORRECT ORDER!!!
The switch panel should now be removed because if you catch it on the door sill whilst manhandling the seat out of the car, you could end up with a 35+ piece electric seat switch kit . . .

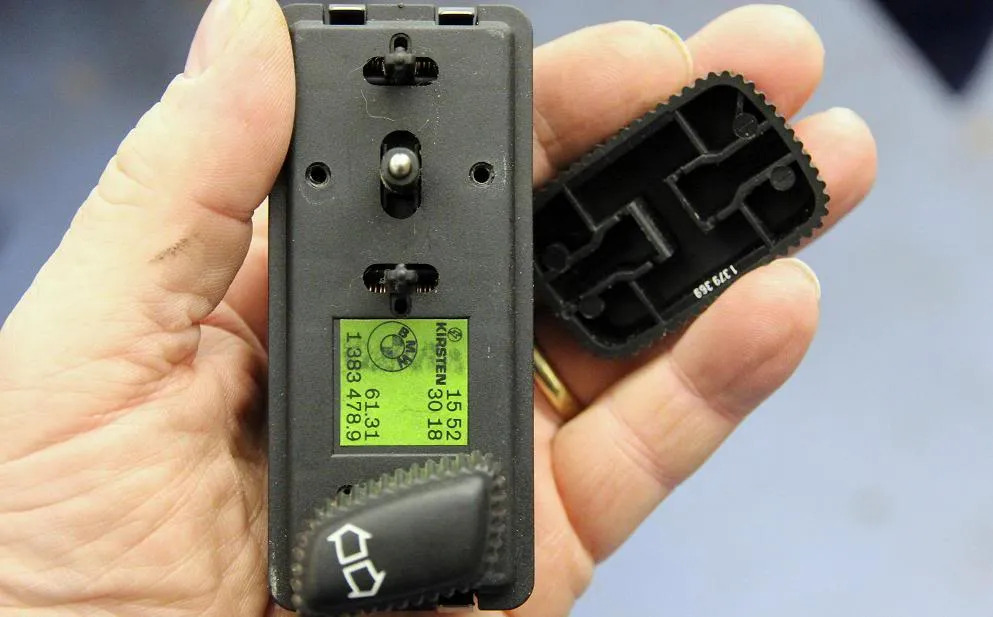
Pry off the seat adjustment knobs gently from between the knob and the seat cover. They look like this……(switched removed for clarity)
Now undo the two phillips screws where indicated in red…..OR ELSE!!! . . . 35 piece switch kit here we come.

Now, remove the two attachment TX20 screws, one shown positioned above in yellow. Both shown here, the rear one is deeply inset but still a TX20 Torx self tapping screw.

The panel will then gently pull away from the side of the seat LEAVING THE SEAT ADJUSTER SWITCH (RED) FIXED TO THE SEAT and the thigh support (blue) and seat memory switches (green) attached to the panel.

Pulling this panel off without removing the 2 self tapping screws holding it to the main switch will end in tears!!
You can now disconnect the thigh support and memory switches by simply unplugging them but to fool you, BMW have fitted a sliding/locking connector to the fragile, expensive, easy to destroy main switch.

The seat can now be lifted over the sill and manipulated out of the car to reveal endless loose change, dropped screws, crispy fries and a few chips.
Assuming you have not found sufficient loose change to retire and let someone else finish the job . . .
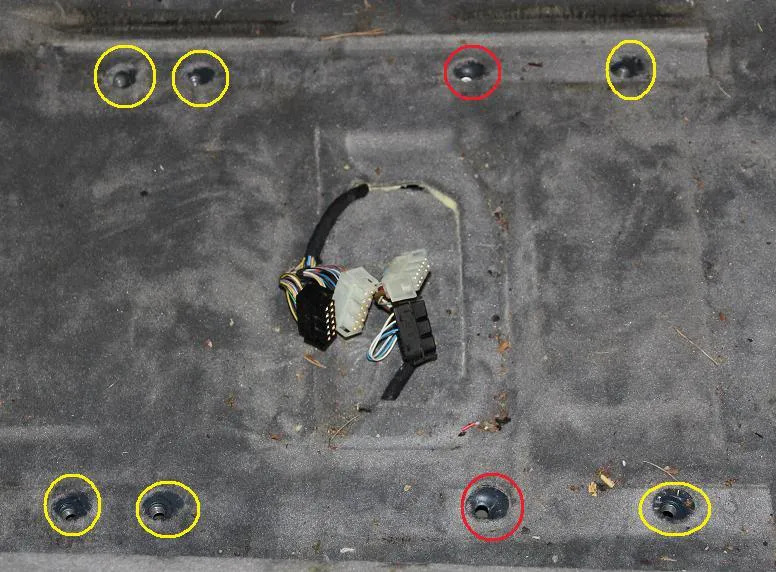
You can now vacuum the carpet to reveal the positions of the 6 attachment bolts shown circled in yellow and the two locating pin recesses previously mentioned circled in red.
To remove the seat and mirror module, SM/SPM, remove these two self tapping screws . . .

There are 3 multiplugs on the front and 3 on the rear. All three on the front are the positive lock type . . .

and to remove, press down where shown in red and swing the lever as shown to release. The remaining connectors are shown here . . .

The ones circled in yellow are all positive locking, the two in blue are a simple push fit.
As BMW decided to add a degree of headache to the task, the one shown in red has a sliding lock connector, removed as indicated.
Here’s a view from behind at the rear 3 . . .

To remove, use a long screwdriver to release the slider as shown.
Here is the wiring protection shield that stops anyone pushing feet under the front seat and kicking the wiring. Fixing holes and fixings circled.

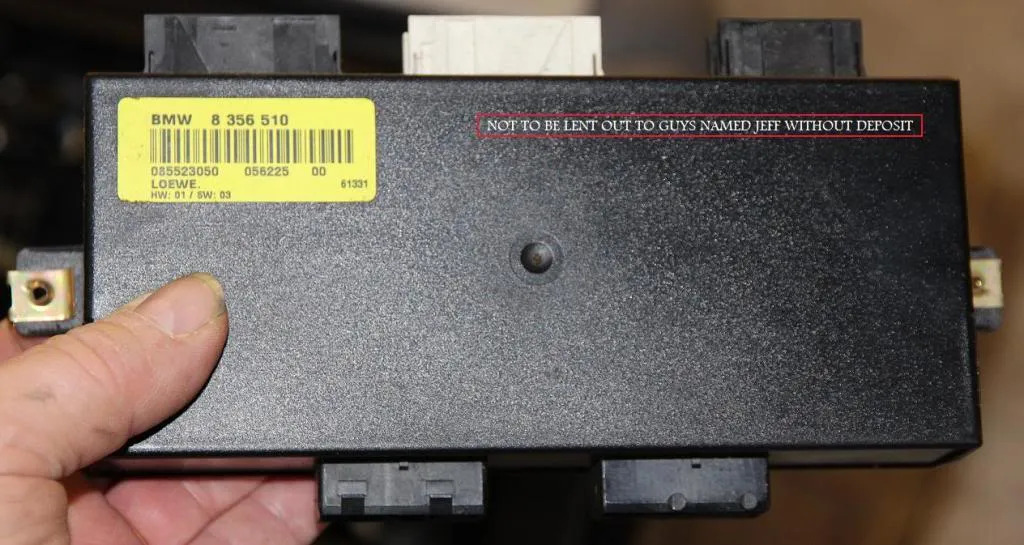
We can now remove the module and I then saw the warning from BMW written on the top right of the module which I had previously missed.
With the seat out, and using a long handled artists brush, I greased the fore/aft adjusting screw . . .

the gear meshing on the tipping mechanism . . .

and the seat frame pivot points . . .

For a change, reassembly is a reversal of removal whereas I normally do it backwards.
Anyway, once refitted, just check everything is working correctly before refitting the seat to the floor and reattaching the sill cover.

Now all I need to do is assemble my 35 piece switch kit I deliberately broke in the interests of research.